Skip to product information
1 of 30

BuildYourCNC

Laser/Spindle Combo Head for Heavy Duty CNC Kit (greenBull)

Laser/Spindle Combo Head for Heavy Duty CNC Kit (greenBull)

Regular price $849.00 USD
Regular price Sale price $849.00 USD
Sale Sold out
Title
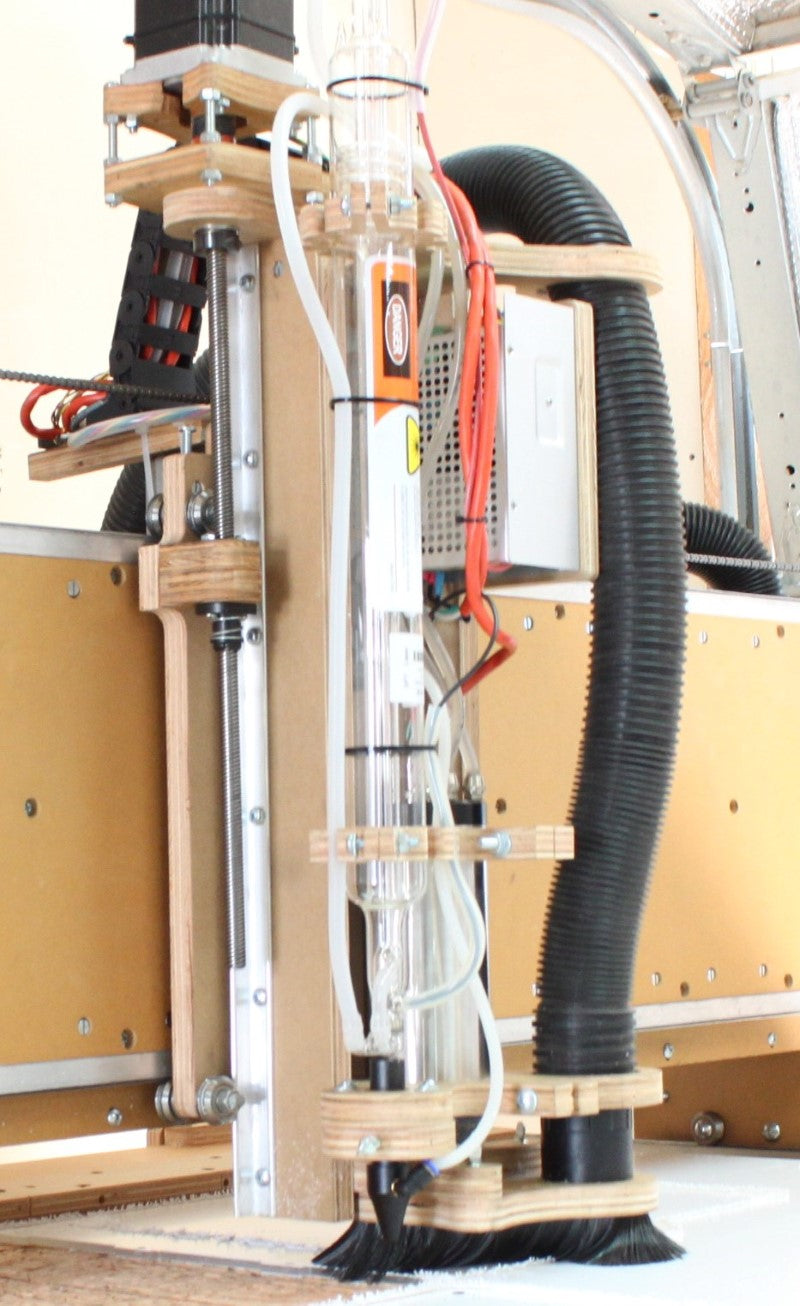
This Laser/Spindle Combo Head is designed to add laser functionality to the greenBull CNC machine. It comes included with a 2.2kw Spindle. With the ability to do laser applications and routing at the same time, this Z-axis attachment will make your machine even more capable of doing large and detailed projects without the need to switch to a different machine. The Laser/Spindle combo head was designed with the idea that laser engraving and CNC machining could be done by the same machine. The Z-Axis attachment is specifically designed to hold a mounted 2.2kw Spindle and a 40 Watt CO2 laser tube simultaneously. If you already have a spindle or laser tube and components, then we also offer options to buy the assembly without these parts. We are also offering the barebones (structure and hardware only) if you wish to supply your own spindle and laser equipment. You can specify whether or not you need 220V or 110V power supply for the laser. Note: Lead screw length for the Z Axis is 16.5 inches. Packing list may saw otherwise. Video: greenBull CNC machine with the Laser/Spindle Hybrid Head - Basswood Trials
View full details

Instructions

1
Step 1
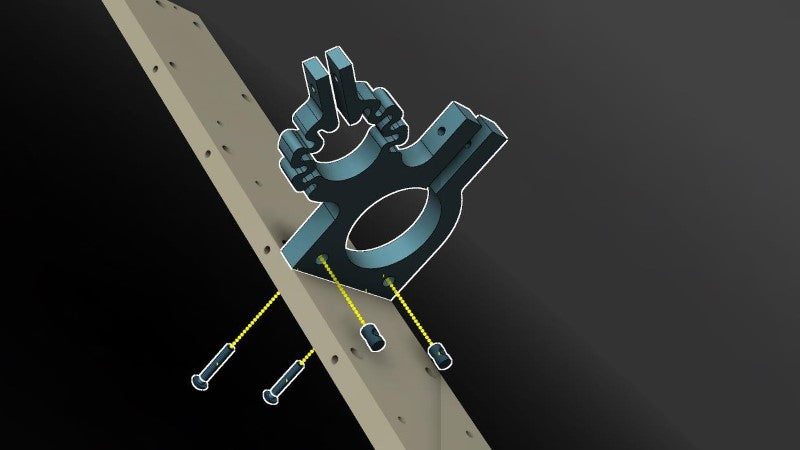
Attach the Spindle top mount to the z-axis back plate using two 1/4" by 1-1/2" screws and two cross dowels.
2
Step 2
Attach the Spindle bottom mount to the z-axis back plate using two 1/4" by 1-1/2" screws and two cross dowels.
3
Step 3
Attach the brush mount support to the z-axis back plate using two 1/4" by 1-1/2" screws and two cross dowels.
4
Step 4
Attach the laser tube top mount to the z-axis back plate using two 1/4" by 1-1/2" screws and two cross dowels.
5
Step 5
Loosely fasten the z-axis rail and right side rail support piece using six 1/4 x 1-1/2 inch screws and cross dowels.
6
Step 6
Repeat the process from the previous step for the left side.
7
Step 7
Position the bottom bearing mount on the top portion of the Z axis.
8
Step 8
Assemble the z-axis bearing mounts using three 1/4" by 2-1/2" screws and cross dowels.
9
Step 9
Insert one 1/2" ID (inside diameter) bearing into the bottom bearing mount along with a 1/2" small diameter washer.
10
Step 10
Repeat the process from the previous step over the lead screw protruding from the top of the bearing mount.
11
Step 11
Assemble two of the 1/2" coupling hubs with a coupling spider in the middle.
12
Step 12
Install the flexible coupling (coupler) at the top portion of the lead screw. Make sure that the lead screw has just enough protrusion that it will be flush with the 1/2 coupling hub flat portion and does not protrude so much that the lead screw will interfere with the coupling spider.
13
Step 13
Assemble the motor to the z-axis motor mount using four 1/4" x 1 - 1/2" screws and four quarter inch nuts.
14
Step 14
Assemble the motor mount to the top bearing mount using four 1/4" by 2 - 1/2" screws and twelve 1/4" nuts.
15
Step 15
Fasten the 1/4" nuts between the motor mount and the bearing mount to secure both pieces.
16
Step 16
Insert the 2.2 kW Spindle through the top and bottom Spindle mounts.
17
Step 17
Attach the air pump to the back plate of the z-axis using a zip tie.
18
Step 18
Attach the power supply to the right rail support using four #6 by 1" screws, four #6 nuts and eight #8 washers.
19
Step 19
Insert a 1/4" by 2-1/2" screw into the top spindle mount using a 1/4" nut and two 1/4" washers.
20
Step 20
Insert a 1/4" by 2-1/2" screw into the bottom spindle mount using a 1/4" nut and two 1/4" washers.
21
Step 21
Insert 1/4" by 1-1/2" thumb screws through the bottom brush support to attach the brush. The 1/4" insert nuts will be in the bottom face of the brush.
22
Step 22
Insert the laser tube through the laser tube mounts with the laser lens facing down.
23
Step 23
Secure the top laser tube mount using one 1/4" by 1-1/2" screw, two 1/4" washers, and one 1/4" nut.
24
Step 24
Secure the bottom laser tube mount using one 1/4" by 1-1/2" screw, two 1/4" washers, and one 1/4" nut.
25
Step 25
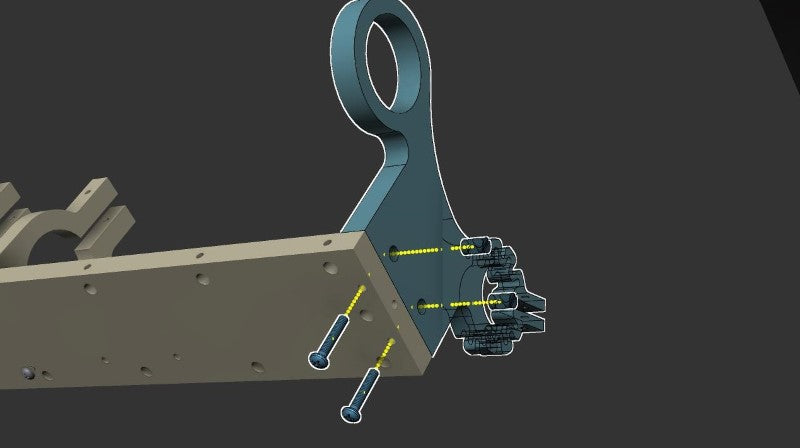
Secure the laser nozzle mount to the bottom spindle mount using two #8 x 2" screws, 2 #8 nuts, 2 1/4" washers and four #8 washers. Important Note: The washers that should be inserted with the top part of the screws are not shown in the image. Please use one 1/4" washer and one #8 washer for each screw.
26
Step 26
Insert the laser nozzle as shown in the image.
27
Step 27
Insert two 1/4" by 1-1/2" thumb screws into the nozzle mount with two cross dowels to adjust the laser nozzle.
28
Step 28
The thumb screws are used to secure the position of the laser nozzle for the alignment process of the laser.
29
Step 29
Maintenance Instructions Before each usage of the laser, make sure to check the laser lens in the nozzle on the bottom of the assembly. Loosen the thumb screw to free the nozzle, then separate the nozzle to expose the laser lens. Make sure the lens has been cleaned properly with a cloth so it is free of dust or any other debris. Also make sure clean water is always used. Periodically inspect the laser mounts to make sure the glass tube is not loose.

Questions & Answers

Have a Question?

Ask a Question
  • Do you have a laser system that works with the 4.1 blacktoe system?

    We do not currently offer a laser kit specifically for the blackToe, however we do offer a combination spindle/laser tube mount for our greenBull machine here: https://buildyourcnc.com/item/cnc-machine-laser-spindle-combo-head. You could probably modify that mount to suit your needs, or you can contact us directly to discuss a custom mount. We also offer all the additional equipment needed to begin lasing -- tube, power supply, mirrors, etc.

  • Can you have interchangeable heads between plasma and milling head on same machine

    Yes, you can simply disengage the spindle mount or z-axis assembly, and engage a plasma mount. There are many variables, however, depending on the machine. Additional Information: Thanks for the reply is there a preferred size table for the plasma milling option Additional Information: The size of the plasma or milling table will depend on how you apply the machine and what size sheet material you plan on cutting and milling. For the plasma work, remember to position a non flammable substance below where the plasma nozzle will be spraying. The particles ejected from the work-piece caused by the cutting action of the plasma nozzle can ignite flammable materials.

  • If a person wanted a larger laser machine than what is offered would they simply mount a laser on one of the larger machines, or is there a problem with doing this?

    Adding a laser tube and supporting electronics and mirrors to larger milling machines is problematic unless a proper mount is provided, as in the greenBull CNC (https://buildyourcnc.com/item/cnc-machine-laser-spindle-combo-head). The existing larger machines (other than the greenBull CNC machine) are designed to be used as milling machines and the laser will not be able to be easily mounted on these machines. Modifications can be done to accomplish this task, but there is quite a bit of effort needed. Additional Information: Additional Information: Additional Information:

  • I have a greenbull 5x with the long Z. Is there a laser kit that I can get for that model?

    Yes, we can provide a laser attachment for the long Z version of the greenBull 4x, 5x and 6x. Please call us to get more information and pricing for the laser attachment.

  • I am looking at purchasing the greenbull 5X system with the laser/spindle combination. Can the laser do both rastered engraving as well as vectored cutting with the same breakout board and software? If I have this wrong please let me know what would be needed to accompish this.

    You can do raster and vector engraving on the greenBull laser/spindle combination. The methods of this process is not accomplished in the same way as the typical laser machines where CorelDRAW is used. The Mach3 laser plug-in can be used for the raster engraving and standard CNC g-code can be used for vector cutting and engraving. The raster method will not be fast on the greenBull since the z-axis is heavy and there are inertial limitation on doing fast raster back and forth movement. Vector is the best use of this machine. Additional Information: Additional Information: Additional Information:

  • Does the laser/sindle head combo include the inverter?

    Yes, if you purchase the option that includes the spindle, then the inverter (VFD - variable frequency drive) is included.

  • What is involved and how long does it take to swap between laser and spindle?

    There is no swapping between spindle and laser. The laser uses a separate output on the controller to be fired. For example, M3 g-code turns on the spindle; M7 g-code turns on the laser.