Zu Produktinformationen springen
1 von 3

BuildYourCNC

2,2 kW (Kilowatt) wassergekühlte Spindel mit Inverter (Frequenzumrichter)

2,2 kW (Kilowatt) wassergekühlte Spindel mit Inverter (Frequenzumrichter)

Normaler Preis $528.00 USD
Normaler Preis Verkaufspreis $528.00 USD
Sale Ausverkauft
Versand wird beim Checkout berechnet
Titel

Bestellen Sie die 2.2kW wassergekühlte Spindel- und Inverter-Kombination für effizienteres, leiseres CNC-Fräsen. Versand aus den USA. Garantie und Support verfügbar. Versuchen Sie nicht, Ihren VFD oder Ihre Spindel selbst zu verdrahten. Konsultieren Sie einen professionellen Elektriker, bevor Sie das Diagramm befolgen.

Jedes VFD-Spindelpaar wird getestet und alle Parameter werden für Ihre Bequemlichkeit konfiguriert, um sicherzustellen, dass VFD und Spindel korrekt und fehlerfrei funktionieren. Falsche Parametereinstellungen können die Spindel oder den VFD beschädigen. Wenn Sie Kabel kaufen, löten wir das Kabel an die Spindel und verbinden es mit dem VFD. Jede Bestellung enthält ein Video des Tests der gekauften Spindel und des VFD. Hier ist das Kabel, das wir zum Kauf mit der Spindel empfehlen, um das kostenlose Löten des Kabelsteckers zu erhalten. https://buildyourcnc.com/item/3d-printer-component-cnc-electronicsandmotors-shieldedcable-wire-4-conductor-18-awg-wrcon-cablewire4conductor18awg Hier ist ein Beispiel für einen Test, den wir durchführen:

Das Stromkabel ist nicht im Lieferumfang enthalten, aber wir zeigen, wie wir das Stromkabel an den VFD anschließen. Wir haben Spindeln vieler Hersteller getestet und diese Spindel und dieser VFD (Variable Frequency Drive) ist die beste, die wir gefunden haben. Diese Spindel hat vier (4) Lager. Vier Lager in Ihrer Spindel sind sehr wichtig und erhalten die Präzision und verlängern die Lebensdauer der Spindel. Wenn Sie planen, eine Spindel von eBay oder einer anderen Quelle zu kaufen, denken Sie daran, dass der Support begrenzt sein wird. Wir unterstützen unsere Spindeln! Sie werden aus den Vereinigten Staaten versandt. Wir können die Spindeln mit unserer jahrelangen Erfahrung unterstützen, da wir uns intensiv mit diesen Spindeln beschäftigt und sehr hart nach der richtigen Spindel und dem richtigen VFD gesucht haben. Es gibt einen Anschluss für die Stromversorgung der Spindel. Drei der vier Anschlüsse werden verwendet, die mit den internen Spulen verbunden sind, die die Spindel drehen lassen. Der vierte Anschluss ist nicht angeschlossen (NC). Spindeln müssen gekühlt werden, und diese Spindel verwendet Wasser zu diesem Zweck. Wichtiger ist, dass dieser Aspekt der Wasserkühlung keine Luftbewegung zur Kühlung der Spindel zulässt (im Gegensatz zu Fräsern, die Luft durch den Fräser bewegen, um durch Konvektion zu kühlen). Wasser kühlt die Spindel durch Leitung (Wärmeübertragung durch Kontakt). Dies ist wichtig, da die Wasserkühlung im Gegensatz zur Luftbewegung den Staub nicht im ganzen Laden verteilt, und der Staub und die Späne, die beim Fräsen und Schneiden übrig bleiben, mit einem Staubsauger oder einer Absaugung entfernt werden können. Die Anschlüsse für die Wasserkühlrohre oder -schläuche befinden sich an der Rückseite der Spindel. Der Anschlussstutzen nimmt einen Schlauch oder ein Rohr mit einem Innendurchmesser von 1/4" (.25 Zoll) und einem Außendurchmesser von 3/8" (.375 Zoll) auf. Jeder Anschluss kann für Ein- oder Auslass verwendet werden. Es ist nur wichtig, dass das Wasser durch den Körper der Spindel fließt. Der Geräuschpegel einer Spindel ist im Vergleich zu Fräsern extrem niedrig. Tatsächlich ist das Geräusch einer Spindel leiser als der eigentliche Schneid- und Fräsvorgang des Schaftfräsers und viel leiser als ein Router. Die Spindel wird mit einer 1/4" (.25 Zoll) Spannzange geliefert, die das Maß der Bohrung (Innendurchmesser) ist, in die der Schaft des Schaftfräsers eingeführt wird. Die Spannzange passt in die Welle, wo der Spannzangenkonus zum Wellenkonus passt. Wenn die Spannzange in diesen Konus eingeführt und die Spannzangenmutter festgezogen wird, klemmt die Spannzange um den Schaft des Schaftfräsers (unterstützt durch die Art und Weise, wie die Spannzange mit all den geschnittenen Abschnitten um die Spannzange herum hergestellt wird). Sie benötigen zwei Schraubenschlüssel, um die Spannzangenmutter auf die Spannzange zu ziehen. Sehen Sie sich das Video über die richtige Technik des Lösens und Anziehens an. Spindeln benötigen einen VFD (Variable Frequency Drive) zum Betrieb. Diese VFDs werden auch als Spindelwechselrichter bezeichnet. Der VFD nimmt den Strom aus der Steckdose und erzeugt eine Frequenz mit Spannung und Strom, um die Spindel zu drehen. Die Frequenz kann gesteuert werden, um die Drehzahl der Spindel zu steuern. Der VFD verfügt über ein Potentiometer zur Einstellung der Geschwindigkeit oder Drehzahl, aber die Drehzahl der Spindel kann auch automatisch über die Steuerungssoftware eingestellt werden. Der VFD verfügt über einen Bildschirm, der viele Aspekte des Zustands oder aktuellen Status der Spindel anzeigt, einschließlich Drehzahl oder Frequenz, Spindeldrehrichtung, eventuell auftretende Fehler oder Störungen und vieles mehr. Jeder Aspekt der Spindel kann vom VFD gesteuert werden, und der VFD kann auch programmiert werden (Einstellungen können konfiguriert werden). Der VFD steuert das Drehmoment und die Sollgeschwindigkeit der Spindel mithilfe der PID-Regelung (Proportional-Integral-Derivative), die sicherstellt, dass die Spindel den Strom und das Drehmoment hat, die sie benötigt, um die Drehzahl unter verschiedenen Lastbedingungen aufrechtzuerhalten. Router können dies nicht und zeigen eine Reduzierung der Drehzahl (Geräuschdämpfung), wenn zusätzliche Last auf den Router gelegt wird, z. B. beim Versuch, tief in Material zu schneiden. Die Steuerung des VFD kann manuell oder vollständig über Steuerungssoftware wie Mach3 und LinuxCNC erfolgen. Die Vorderseite des VFD enthält Tasten für Run, Mode, Reverse/Jog, Stop. Reset, Enter und verschiedene Pfeiltasten zum Durchsuchen und Einstellen verschiedener Funktionen über das Menü. Der VFD enthält viele Anschlussklemmen für die Verdrahtung der Spindel mit dem VFD, die Verdrahtung des Controllers (Computer oder anderes Steuergerät) mit dem VFD und die Verdrahtung des VFD mit der Steckdose für die Netzstromversorgung. Die Spindel selbst wiegt 10,93 lbs. Enthaltene Teile: 2,2 kW Spindel 110 V oder 220 V Wechselrichter (VFD) 110 V oder 220 V Spannzange: ER20 1/4" 4-Pin Stecker Spannzangengröße für 2,2 kW Spindel: ER20 Spindeldurchmesser: 80 mm

Vollständige Details anzeigen

Instructions

1
Step 1
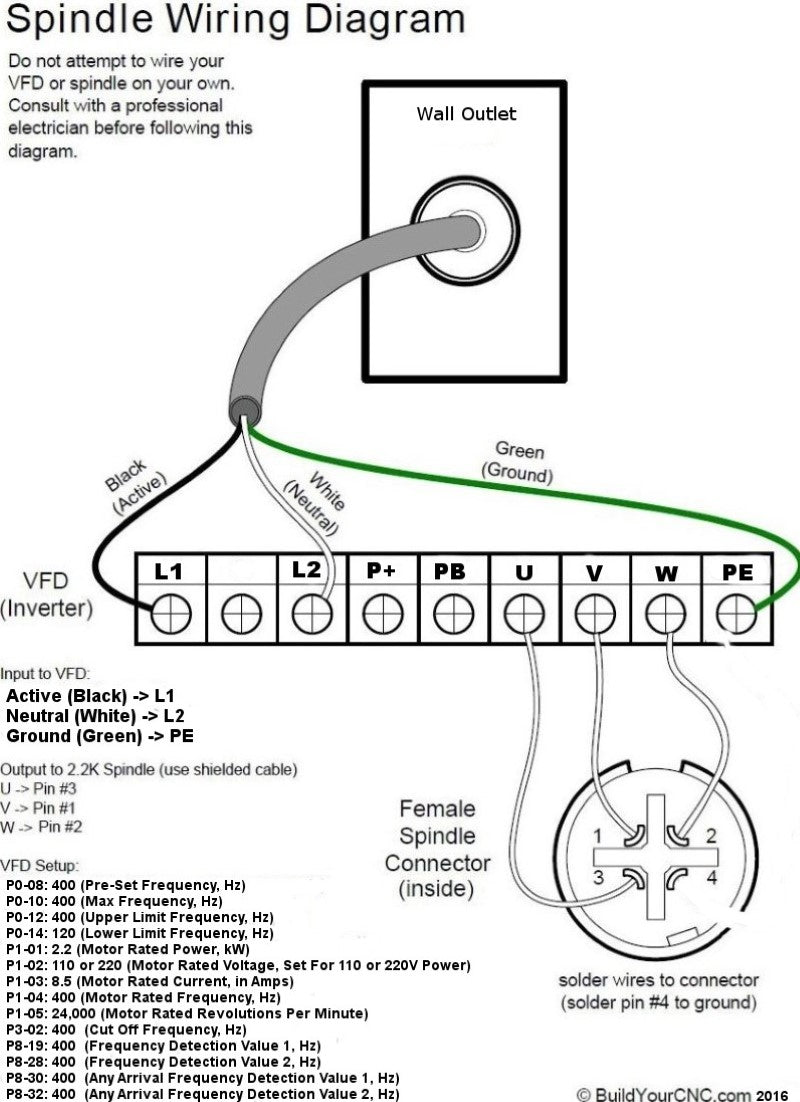
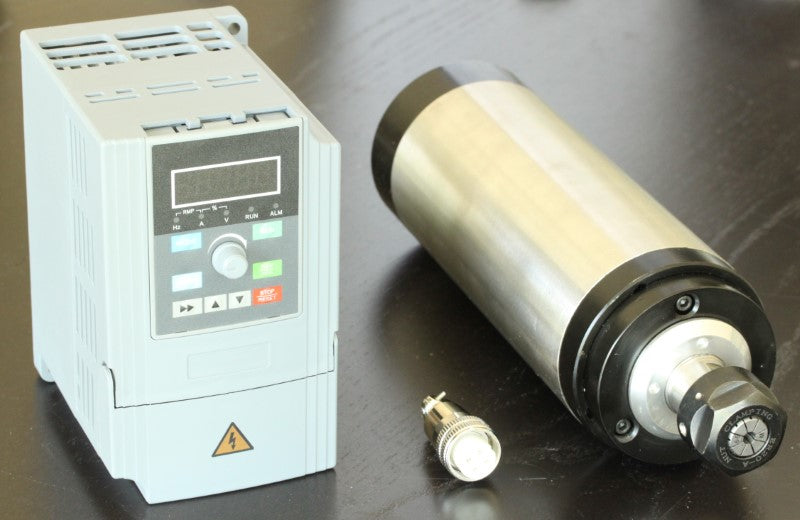
Spindle Wiring Diagram U -> Pin #3 V -> Pin #1 W -> Pin #2 Pin #4 is disabled. How to Program Inverter / VFD When Inverter is first powered on, there should be text flashing on the screen. Step 1: Press "MODE" button. The screen should now say "P0" Step 2: Use the UP and DOWN arrow keys to change the P setting to the desired parameter. Example: To change setting P3-02 use the SIDE arrow to move the cursor. The flashing digit is the one currently selected. Change the digits using the arrows until the screen reads P3-02. Step 3: Press "Enter" to input the parameter for the setting. Example: After you have used the arrow buttons to select your setting, press the "ENTER" button and the screen will now change to the parameter. For instance: Setting P3-02 should be changed to 400.00. Step 4: Change the parameter using the arrows. When you have input the correct parameter, press "ENTER" again to save your setting. 400 Hz is equivalent to 24,000 RPM. It is a linear conversion from 0 to 400 Hz, for instance, 200 Hz is 12,000 RPM VFD Settings: Disclaimer: These values are provided for your convenience. Verify with the values in the manual that came with your VFD. Employ or seek the guidance of a professional electrician experienced in motor, spindle and VFD specifications and operation. THE WARRANTY OF THE SPINDLE AND VFD DEPENDS ON THE PROPER SETTING OF PARAMETERS AND THE USE OF A PROFESSIONAL ELECTRICIAN EXPERIENCED IN THIS TYPE OF OPERATION. I have not thoroughly tested the ranges of all parameters, and cannot vouch for the default values in the VFD that you are using. These instructions are an attempt to assist in cross referencing the parameters of disparate VFDs. To start and stop the spindle under Mach3, use a relay on your interface board (controller, like the Pokeys57CNC, Mach3 USB board, or parallel breakout board) and connect one side of the relay to DCM (XGND on some VFDs) and the other side of the relay to FOR (FWD on some VFDs). If the CNC controller contains more than 1 relay, you can use the relay to start the spindle in reverse mode using the same DCM (VGND) and the REV terminals.
Basic parameters that we recommend setting and confirming for simple control panel operation. Use the parameter that matches your VFD (i.e. PD###, P#-##, P##.##).
  • Main Frequency, Hz: In digital operator mode (PD001 set to 0) the VFD/Inverter will run at this parameter value and can be changed at the control panel using the up and down arrows. In multi-speed, this value is the same as Speed 1. If the VFD is set to use the external multi-terminals, then speed 1 will be set by the analog of the external terminals. This parameter value is limited by the maximum operating frequency
    • PD003: 400
    • P0.00: 400
  • Base Frequency/Pre-Set Frequency, Hz
    • PD004: 400
    • P0-08: 400
  • Max Frequency/Upper Limit Frequency, Hz
    • PD005: 400
    • P0-10: 400
    • P0-12: 400
    • P0.04: 400
    • P0.05 (At Max Voltage): 400
  • Intermediate Frequency, Hz. This value coincides with the intermediate voltage related to the ramping up of the spindle. This is to say, at the intermediate voltage (below PD009) of 13V, the intermediate frequency will be 2.5Hz. Be careful with this setting as a frequency too high for the set intermediate voltage can cause the spindle to try to spin up too fast. When the spindle tries to spin up at a higher frequency than the voltage is set, the spindle will draw more current to try to get up to that frequency. That means that you can get an over-current condition and that can also harm the spindle coils (too much current means too much heat equals melting the insulation of the copper wires of the coils, causing the coil wire to short and reducing the resistance of the coil, causing even more current draw, causing lots of smelly smoke and no more cutting of wonderful things).
    • PD006: 2.5
    • P00.07: 3.5
  • Maximum Voltage, V: 220 for a 220 Spindle and 110 for a 110 Spindle. (Check the spindles nameplate or marking for this value)
    • PD008: see above
    • P00.06: see above
  • intermediate Voltage, V: This is at what voltage the spindle will turn at the intermediate frequency setting. If you try to use a voltage setting that causes the spindle to try to spin up too fast, the spindle will over-torque causing an over-current condition. Be careful when setting this value and see the explanation for the intermediate frequency above.
    • PD009: 13
    • P00.08: 10
  • Minimum Voltage, V. This is the minimum STARTING voltage of the spindle and coincides with the lower limit frequency below. See the warning in the intermediate frequency above.
    • PD010: 6.5
    • P00.10: 5
  • Minimum Frequency, Hz. See the warning in the intermediate frequency above.
    • PD007: 0.5 allows only a max of 20Hz for this parameter
    • P0.09: .2
  • Lower limit frequency Hz: This is the control frequency that you want to set to make sure the spindle is not run at a frequency lower than the spindle can handle. All spindles of this nature have a speed (frequency) range that is can safely operate. This is set to 0 since the spindle that you will use may be a spindle that oper ates at a a different range. For example, for a spindle that is sold here, it is safe to run the spindle at 300Hz at the lowest. It may be fine to run it lower but be careful as you may reach the limit of your spindle and the coils will be damaged.
    • PD011: 0
    • P0-14: 120
  • VF Curve Settings: 0-4. For this type of VFD, this is used in lieu of the Lower, and intermediate frequencies and voltages.
    • P00.12: 0
  • Motor Rated Power, kW
    • P1-01: 2.2
  • Motor Rated Voltage, Set according to what voltage your spindle/VFD uses
    • P1-02: 110 or 220
  • Motor Rated Current, in Amps
    • PD142: 7
    • P1-03: 8.5
  • Motor Rated Frequency, Hz
    • P1-04: 400
  • Motor Rated Revolutions Per Minute, RPM
    • P1-05: 24000
    • PD144: 3000
  • Cut Off Frequency, Hz
    • P3-02: 400
  • Frequency Detection Value 1, Hz
    • P8-19: 400
  • Frequency Detection Value 2, Hz
    • P8-28: 400
  • Any Arrival Frequency Detection Value 1, Hz
    • P8-30: 400
  • Any Arrival Frequency Detection Value 2, Hz
    • P8-32: 400
  • Motor Pole Number: Confirm on the motor nameplate for the number of poles on your spindle
    • PD143: 4
  • Inverter Frequency Standard: 0: 50Hz, 1: 60Hz
    • PD176: 1
Parameters for Extended Customization
  • Parameter Lock: 0: Invalid, 1: Valid (The parameters will be lock and prevents tampering of the parameter values)
    • PD000: 0
    • P00.13: 0 (This VFD also includes 10: Restore factory settings)
  • For PD### VFDs: Run Control Source (Run Commands): 0: All run commands are controlled by the front panel of the VFD/Inverter, 1: The run commands are controlled by the multi-terminals (the control is by an source like a computer using Mach3 or equivalent control program), 2: Communications port (i.e. a connection from a computer or other device that communicates via RS-245 serial, like an FTDI to USB converter)
    • PD001: 0
  • For P##.## VFDs: Run Control Source (Run Commands): 0: All run commands are controlled by the front panel of the VFD/Inverter, 1: The run commands are controlled by the multi-terminals (the control is by an source like a computer using Mach3 or equivalent control program), but the STOP key still works, 2: Same as (1) but the STOP key will not work, 3: Communications port (i.e. a connection from a computer or other device that communicates via RS-245 serial, like an FTDI to USB converter), 4: By user application program control electronics.
    • P00.01: 0
  • Frequency Control Source: 0: Panel (Potentiometer on the front panel), 1: Board or External potentiometer (refer to the PD070-076 for related parameter for controlling the analog input, 2: Communications port (i.e. a connection from a computer or other device that communicates via RS-245 serial, like an FTDI to USB converter)
    • PD002: 0
  • Acceleration Time: The time it takes to ramp up to the set speed
    • PD014, 16, 18 and 20: Specify the longest time that you can allow. If the time is too low, the spindle will draw excessive power and will cause a fault
  • Deceleration Time: The time it takes to slow down to the stop or lower limit frequency
    • PD015, 17, 19 and 21: Specify your maximum allowable time.
  • Reverse Rotation Select: 0: Reverse Run forbidden (will not run in the reverse direction), 1: Reverse Run Enable
    • PD023: 1
  • STOP Key Select: 0: STOP Invalid (the STOP panel button will be disabled), 1: STOP Enabled
    • PD024: 1
  • Starting Mode: 0: Start from starting frequency, 1: Frequency track start
    • PD025: 0
  • Stopping Mode: 0: Deceleration Stop, 1: Coasting stop (prepare to wait for a while for the spindle to stop depending on the condition of the bearings), 2: (Only for P## VFDs) DC Brake Stop (See PD029-31 for DC Braking for the PD### VFDs)
    • PD026: 0
    • P00.03: 0
  • Starting Frequency: 0.1 to 10.0 Hz
    • PD027: .5
  • Stopping Frequency: 0.1 to 10.0 Hz
    • PD028: .5
  • Braking Time at Start: 0-25
    • PD029: 0
  • Braking Time at Stop: 0-25
    • PD030: 0
  • DC Braking Level: 0-20%
    • PD031: 2.0
  • Frequency Track Time: 0.1-20.0 Seconds
    • PD032: 5.0
  • Current Level for Frequency Track: 0-200.0 Seconds
    • PD033: 150.0
  • Voltage Rise Time during Frequency Track: 0.1-10 Seconds
    • PD034: 0.5
  • Jogging Frequency: 0-400 Hz
    • PD042: 5.00
  • S-Curve Time: 0-6500 Seconds
    • PD043: 0
Digital Input/Output Terminal Parameters: Set these parameters if you will be connecting digital signals to the terminals to allow the computer or other device to control the VFD/Spindle.
  • PD044 - PD049 (Terminals D1-D6): 0: Invalid, 1: Run, 2: Forward rotation, 3: Reverse Rotation, 4: Stop, 5: Forward/Reverse, 6: Jog, 7: Jog forward rotation, 8: Jog reverse rotation, 9: Timer1, 10: Timer2, 11: Reserved, 12: Overheat signal of heat sink or motor, 13: Emergency stop, 14: Reset, 15-16: Reserved, 17: Ramp select1, 18: Ramp select2, 19: Multi-speed1, 20: Multi-speed2, 21: Multi-speed3, 22: High speed, 23: Middle speed, 24: Low speed, 25: PID Start, 26: Reserved, 27: UP function counter, 28: DOWN function, 29: Drawing, 30: Reserved, 31: Counter, 32: Counter reset
    • PD044 (FOR/Forward-D1): 02: Forward rotation
    • PD045 (REV/Reverse-D2): 03: Reverse Rotation
    • PD046 (RST/Reset-D3): 14: Reset
    • PD047 (SPH/Speed High-D4): 22: High speed
    • PD048 (SPL/Speed Low-D5): 24: Low speed
    • PD049 (SPM/Speed Medium-D6): 23: Middle speed
  • PD050 - PDPD053 (Terminals Y1, Y2, FA, FC, KA, KB): 0: Invalid, 1: Run, 2: Zero Speed, 3: Fault indication, 4: Braking indication, 5: Set frequency reach, 6: In acceleration, 7: In deceleration, 8: Arbitrary Frequency 1 reach, 9: Arbitrary frequency 2 reach, 10: Motor overload alarm, 11: Over torque alarm, 12: Inverter overload alarm, 13: Counter reached, 14-16: Reserved, 17: Low voltage alarm, 18: Single stage end indication, 19: Process end indication, 20-26: Reserved, 27: Drawing reached, 28: PID lower limit alarm, 29: PID upper limit alarm, 30: Reserved, 31: Braking resistor act, 32: Fan act.
    • PD050 (Y1 Output): 01: Run
    • PD051 (Y2 Output): 05: Set frequency reached
    • PD052 (Terminals FA, FB, FC): 03: Fault indication
    • PD053 (Terminals KA, KB): 03: Fault indication
  • VO Output: Output of digital frequency signals 0-7
    • PD054: 0
  • VO Analog Output Gain: 0-100%
    • PD055: 100
  • Skip Frequency 1, Hz: 0-400
    • PD056: 0.00
  • Skip Frequency 2, Hz: 0-400
    • PD057: 0.00
  • Skip Frequency 3, Hz: 0-400
    • PD058: 0.00
  • Skip Frequency Range: 0.10-10.0
    • PD059: 0.5
  • Uniform Frequency 1, Hz: 0-400
    • PD060: 0.00
  • Uniform Frequency 2, Hz: 0-400
    • PD061: 0.00
  • Uniform Frequency Range, Hz: 0.10-10.00
    • PD062: 0.50
  • Timer 1 Time: 0-10.0
    • PD063: 0.1
  • Timer 2 Time: 0-100
    • PD064: 1
  • Counting Value Set: 00-65500
    • PD065: 00
  • Intermediate Counter: 0-65500
    • PD066: 0
  • Analog Input Quantity 1 Regulation Multistage Velocity: 0-100%
    • P00.11: 100
  • Analog Input: 0: 0-10V, 1: 0-5V, 2: 0-20mA, 3: 4-20mA, 4: 0-10V, stacked 4-20mA Exterior pulse of input
    • PD070: 0
  • Analog Filtering Constant: 0-50
    • PD071: 20
  • Higher Analog Frequency, Hz: 0.00-400.00
    • PD072: 50.00
  • Lower Analog Frequency, Hz: 0.00-400.00
    • PD073: 0
  • Bias direction at Higher Frequency: 0: Positive direction, 1: Negative direction
    • PD074: 0
  • Bias Direction at Lower Frequency: 0: Positive direction, 1: Negative direction
    • PD075: 0
  • Analog Negative Bias Reverse: 0: Not allowable, 1: Allowable
    • PD076: 0
  • Up/Down function: 0: Not memorized, 1: Memorized
    • PD077: 0
  • Up/Down Speed: 0: 0.01 Hz, 1: 0.1 Hz
    • PD078: 0
Multi-Speeds Operation
  • PLC Operation (Programmable Logic Controller Operation): 0: Normal Run, 1: Internal Control 16-Speed, 2: External control 4-speed, 3:External control 8-speed, 4: Drawing, 5: disturbance
    • PD080: 0
  • Internal Control Multi-Speeds Operation: 0: Stop after running after 1 cycles, 1: Cycling run, 2: Auto-stop after running after 1 cycle (STOP for intervention), 3: Auto-run and cycling (Stop for intervention)
    • PD081: 0
  • PLC Before 8-Speeds Running Direction: 0-255 (0: Forward, 1: Reverse)
    • PD082: 0
  • PLC After 8-Speeds Running Direction: 0-255 (0: Forward, 1: Reverse)
    • PD083: 0
  • Before 8-Speeds PLC Ramp Time: 0-65535
    • PD084: 0
  • After8-Speeds PLC Ramp Time: 0-65535
    • PD085: 0
  • Frequency 2, Hz: 0.00-400.00
    • PD086: 15.00
  • Frequency 3, Hz: 0.00-400.00
    • PD087: 20.00
  • Frequency 4, Hz: 0.00-400.00
    • PD088: 25.00
  • Frequency 5, Hz: 0.00-400.00
    • PD089: 30.00
  • Frequency 6, Hz: 0.00-400.00
    • PD090: 35.00
  • Frequency 7, Hz: 0.00-400.00
    • PD091: 40.00
  • Frequency 8, Hz: 0.00-400.00
    • PD092: 0.50
  • Frequency 9, Hz: 0.00-400.00
    • PD093: 10.00
  • Frequency 10, Hz: 0.00-400.00
    • PD094: 15.00
  • Frequency 11, Hz: 0.00-400.00
    • PD095: 20.00
  • Frequency 12, Hz: 0.00-400.00
    • PD096: 25.00
  • Frequency 13, Hz: 0.00-400.00
    • PD097: 30.00
  • Frequency 14, Hz: 0.00-400.00
    • PD098: 35.00
  • Frequency 15, Hz: 0.00-400.00
    • PD099: 40.00
  • Frequency 16, Hz: 0.00-400.00
    • PD100: 45.00
  • Timer : 0.0-6500.0 Seconds
    • PD1: 10
  • Timer 1: 0.0-6500.0 Seconds
    • PD101: 10
  • Timer 2: 0.0-6500.0 Seconds
    • PD1102: 0
  • Timer 3: 0.0-6500.0 Seconds
    • PD1103: 0
  • Timer 4: 0.0-6500.0 Seconds
    • PD104: 0
  • Timer 5: 0.0-6500.0 Seconds
    • PD105: 0
  • Timer 6: 0.0-6500.0 Seconds
    • PD106: 0
  • Timer 7: 0.0-6500.0 Seconds
    • PD107: 0
  • Timer 8: 0.0-6500.0 Seconds
    • PD108: 0
  • Timer 9: 0.0-6500.0 Seconds
    • PD109: 0
  • Timer 10: 0.0-6500.0 Seconds
    • PD110: 0
  • Timer 11: 0.0-6500.0 Seconds
    • PD111: 0
  • Timer 12: 0.0-6500.0 Seconds
    • PD112: 0
  • Timer 13: 0.0-6500.0 Seconds
    • PD113: 0
  • Timer 14: 0.0-6500.0 Seconds
    • PD114: 0
  • Timer 15: 0.0-6500.0 Seconds
    • PD115: 0
  • Timer 16: 0.0-6500.0 Seconds
    • PD116: 0
  • Auto PLC Memory Function: 0-1
    • PD117: 0
  • Over-Voltage Stall Prevention: 0-1
    • PD118: 1
  • Stall Prevention at Acceleration: 0-200
    • PD119: 150
  • Stall Prevention at Constant Speed: 0-200
    • PD120: 0
  • Deceleration Time of Stall Prevention at Constant Speed: 0.1-25.5
    • PD121: 5
  • Stall Prevention Level at Deceleration: 0-200
    • PD122: 150
  • Over-Torque Detect Mode: 0-3
    • PD123: 0
  • Over-Torque Detect Level: 0-200
    • PD124: 0
  • Over-Torque Detect Time: 0.1-20.0
    • PD125: 1.0
  • Pulse Counter Memory: 0-1
    • PD126: 0
  • Number of Auxiliary Pump: 0-2
Water Supply with Constant Pressure
    • PD130: 0
  • Continuous Operating Time of Auxiliary Pumps: 1-9000 Minutes
    • PD131: 60
  • Interlocking time of Auxiliary Pumps: 0-250 Seconds
    • PD132: 5
  • High Speed Running Time: 1-250 Seconds
    • PD133: 60
  • Low Speed Running Time: 1-250 Seconds
    • PD134: 60
  • Stopping Voltage Level: 1-150%
    • PD135: 95
  • Lasting Time of Stopping Voltage Level: 1-250 Seconds
    • PD136: 30
  • Wake Up Level: 1-150%
    • PD137: 80
  • Sleep Frequency, Hz: 0.00-400.00
    • PD138: 20.00
  • Lasting Time of Sleep Frequency: 1-250 Seconds
    • PD139: 20
Motor Function Parameters
  • Rated Motor Voltage: Set According to Motor Nameplate
    • PD141: *
  • Rated motor Current: Set according to Motor Nameplate
    • PD142: *
  • Motor Pole Number: Number of Magnetic Poles. 2.2kW Spindles typically use 4 Poles
    • PD143: 04
  • Rated Motor Revolutions: 24000
    • PD144: 1440
  • Auto-Torque Compensation: 3.0-10.0
    • PD145: 2.0
  • Motor No-Load Current: 0100
    • PD146: 40
  • Motor Slip Compensation: 0.0-100
    • PD147: 0.0
  • Auto-Voltage Regulation: 0-1
    • PD150: 1
  • Auto-Energy Saving: 0-20
    • PD151: 0
  • Fault Restart Time: 0.2-25
    • PD152: 1
  • Restart After Instantaneous Stop: 0: Invalid, 1: Frequency Track
    • PD153: 0
  • Allowable Power Breakdown Time: 0.1-5.0 Seconds
    • PD154: 0.5
  • Number of Abnormal Restart: 0-10
    • PD155: 00
PID Parameters
  • Proportional Constant (P): 0.0-1000.00%
    • PD156: 100%
  • Integral Time (I): 0.1-3600.00 Seconds
    • PD157: 5.0
  • Differential Time (D): 0.01-10.00 Seconds
    • PD158: 0
  • Target Value: 0.0-100.0%
    • PD159: 0
  • Target Value Select: 0: Set by the operator, 1: Set by external terminals (0-10 volts)
    • PD160: 0
  • PID Upper Limit: 0-100%
    • PD161: 100
  • PID Lower Limit: 0-100%
    • PD162: 0
Communication Function
  • Communication Addresses: 0-250
    • PD163: 0
  • Communication Baud Rate: 0-3
    • PD164: 0
  • Communication Data Method: 0-5
    • PD165: 0
Monitor Functions
  • Display Items: 0-5
    • PD170: 0
  • Display Items Open: 0-15
    • PD171: 0
  • Fault Clear: 00 10 (01 for fault cleared)
    • PD172: *
  • Voltage Rating of Inverter: Set according to the model
    • PD175: *
  • Rated Current of Inverter: Set according to the model
    • PD174: *
  • Inverter Model
    • PD175: *
  • Inverter Frequency Standard: 0: 50Hz, 1: 60Hz
    • PD176: 1

Questions & Answers

Have a Question?

Ask a Question
  • What is the longest 1/2" Acme lead screw that I can buy?

    We can supply 1/2" lead screw with a maximum continuous length of 77 inches. Additional Information: Please give me a cost on a 6'x 1/2" lead screw. Thank you Additional Information: no Additional Information: what is the total cost for 77 inches of 1/2 inch lead screw? Additional Information: what is the cost of 6 feet lead screw.

  • Hi! can i order a 6 ft long 1/2'' Lead screw with the motor and the gears with it?

    1/2" lead screw can be purchased in one length up to 77 inches (6 feet, 5 inches). Motors are found under the "Motion Electronics" menu, and gears can be found under "Mechanical Components".

  • Can you control the VFD from mach3?

    Yes, you can control the VFD using the a relay.� You will need to connect the relay output (NO) to the forward terminal of the VFD and the gnd terminal.� You will need to look at the diagram for your VFD to determine which gnd to use in the set of terminals that is associated with the forward terminal.� The forward terminal may be called something else, but the manual will tell you (something like X1, or D1, etc.) You will also need to change a parameter in the VFD to use the external�terminals as opposed to the control from the control�panel.

  • Are there any other manuals for the VFD that comes with the 2.2kw spindle?

    We have manuals for the VFD rather than the spindles. Can you specify what issue you may be having so we can help you better? Additional Information: I am having trouble wiring the VFD. (From the wall outlet to the VFD) I think the manual or setup guide on your website is wrong. The two diagrams show two different sets of terminals on the page. Also, do you have a video or other documentation on programming the VFD? Your videos and documentation looks like it only covers the 1.2kw version. Are the two different spindles from different manufacturers?

  • Are there any special instructions regarding connecting water lines to the 2.2k spindle?

    There is no specific manner in connecting the water lines to the spindle. No specific output and input locations, only the diameter which we use is 1/4 Inside Diameter and 3/8 Outside Diameter (you might find another one that works just as well). Unscrew the 2 hose nuts and feed the tube through (will be snug), and adjust the tube on the hose fittings and screw the hose nuts down. Feed the tubes through your machine towards the water bucket, making sure it will not get caught on any moving parts and cause a jam/leak, and fit one tube to the outlet of your water pump and leave the other tube to the bucket as a return line. (unless you are using a cooler like a radiator, then feed it to the outlet of the radiator and to your water pump)

  • Can the 2.2 KW water cooled spindle be fitted with a 1/2" chuck/collet ?

    Absolutely. You can have 1/2" collets used in 2.2kW spindles. Here is a link for the ER-20 1/2"ID Collet: https://www.buildyourcnc.com/item/spindle-collet-!5-er20-spindle-collet

  • I bought a 2.2 Kw spindle and YL620 A-2 from you and am getting an ER 4 message. How do I fix it?

    If the VFD is presenting an ER 4 error, the VFD is most likely damaged. The VFD will either need to be serviced or you will need to purchase another VFD. The latter is probably the less expensive option, unfortunately. Additional Information: Additional Information: i had that error and found a power in wire touching and fixed and started and all was good. good luck Additional Information: i had that error and found a power in wire touching and fixed and started and all was good. good luck Additional Information: i had that error and found a power in wire touching and fixed and started and all was good. good luck Additional Information: i had that error and found a power in wire touching and fixed and started and all was good. good luck

  • What is the minimum RPM for the 2.2 kW spindle? Info on spindle page says 0-24,000. Elsewhere in this knowledge base it says 6000. My edge finder has a1500 RPM limit.

    The lowest Hz for a 2 pole 2.2kW spindle is 250 Hz. That works out to 15,000 RPM. If you need lower RPM, a separate spindle will be required. This is typical for industrial CNC machines where spindles are changed out to mill on different materials. Additional Information: Thank you for the reply. Does that mean the 2.2 kW spindle sold by BYCNC is a 2-pole, not a 4-pole? There don't seem to be specs on the website for the 2.2 kW spindle. I currently have the 1.5 kW spindle from BYCNC and can run from 0-24000. 1500 is no problem. I never mill at that low of a speed, just use the edge finder to set the workpiece coordinates.

  • vfd error 4 code, how do I fix this?

    Remember, steps to correct and troubleshoot issues with any electrical devices should be done by a professional electrician. If you have an HY series VFD, the fault codes are below: OC-1: Over-current during ramp up or over-current at constant speed. Recommended actions: 1, 2, 3, 4 OC-1: Over-current during ramp up or over-current at constant speed. Recommended actions: 1, 2, 5, 6 OC-2: Over-current at deceleration or over-current at stop. Recommended actions: 1, 7, 2, 9, 10 dL: Output short circuit. Recommended actions: 11, 1, 10 Ou-1 or 2: Over-voltage at stop, over-voltage at acceleration, over-voltage at constant speed or over-voltage at deceleration Recommended actions: 12, 13 Fb: Fuse break. Recommended actions: 14, 10 Lu: Low voltage. Recommended actions: 15, 16, 17 OH: Over heat of inverter. Recommended actions: 18, 19, 20 OL-1: Inverter overload 150% per minute Recommended actions: 2, 21, 22 OL-2: Motor overload 150% per minute. Recommended actions: 21, 23, 24, 25, 26, 21 dT: Motor over-torque Recommended actions: 21, 23 E.b.S.A or E.b.S.n or E.b.S.d or E.b.S.S: No feedback from the auxiliary coil or the lectromagnetic contactor Recommended action: 27 bt: Braking transistor damage. Recommended action: 27 CPu: CPU fault. Recommended action: 27 E.E.E.S or E.E.E.n or E.E.E.d or E.E.E.A: EEPROM fault Recommended action: 27 List of recommended actions: If error shows at ramp up or at constant speed: 1. Check for a short circuit or partial short circuit and the insulation of the output wire is sufficient. 2. Increase the capacity or the inverter if it is too small. Replace with an inverter that has a larger capacity 3. Extend the ramp-up time 4. Decrease the torque and increase the set value. 5. Check if the motor is blocked and if there is a sudden change in load. 6. Check if there is a sudden chance in the power supply voltage. 7. Extend ramp down time 9. DC breaking is too high. Decrease DC breaking 10. Replace the inverter. 11. Check to see if there is a short circuit with the connection wire of the motor. 12. Extend the ramp-down time or add a breaking resistor. 13. Check the mains supply voltage and insure there isn't ant sudden change in voltage. 14. Send the inverter for repair. 15. Check whether the input voltage is normal 16. check whether there is a sudden change in load. 17. Check whether there is any phase missing. 18. Check the fan in the inverter. Is it spinning? Is it blocked? Does it have any foreign matter stuck on the fins of the fan? If so, clear the fan. 19. Check the ambient temperature in the space that the inverter is placed. 20. Check for adequate ventilation for the inverter where it is placed. 21. Check for jamming or any sudden change with respect to mechanical load. 22. Set the V/F curve correctly. 23. The motor is too small. 24. The motor is hot and the insulation of the motor degraded. 25. Check if the voltage has a large variance. 26. Check if there is a phase missing. 27. Contact the supplier Additional Information: I have cnc wood carving machine 1325 the inverter showing error 0006 Additional Information: What is uc3 error Additional Information: My inverter read error oc-1 high frequency how you can help me please Additional Information: My inverter read error oc-1 high frequency how you can help me please Additional Information: 203 Additional Information: E2 error Additional Information: Hello , I have an Redsail cnc and I get the following error " UC3 "after that the spindle stops arter a small knocking sound ,would there be an solution to this ? Additional Information: Additional Information: what does it mean when my spindle VFD shows E o and stops. Additional Information: Vfd er.01.5c Additional Information: CPFO error displayed reason Additional Information: Solve it Additional Information: My Spindle VFD Holip HLPA01D523C get error E.OC.A after factory reset. and now get error E.OC.n after i change the starting mode from Start from Starting Frequency to Frequency track start. whats wrong with the vactory setting? Additional Information: Er20 Additional Information: Fault 503 Additional Information: Fault 503 Additional Information: What VFD do you have? Additional Information: When I on the motor the derave right oc2 it move then it stop again Additional Information: When I on the motor the derave right oc2 it move then it stop again Additional Information: what does it mean when my spindle VFD shows E.Lu.S and stops. Additional Information: Dear si my emetron ac drive ERR 05 PROBLEM Additional Information: Err04 Additional Information: Err04 Additional Information: Error 4 Additional Information: Error 4

  • Hello. I�m interested in buying a water cooled spindle and VFD. I have an Avid Pro CNC and would love to control it using Mach 4 but I keep hearing it�s difficult to integrate. Also, is the water pump 120 or 240? I�d love any advice etc. eBay is a web of confusion with all of the options. Thank you.

    You will need to look for the parameter that controls the run frequency. The frequency can be controlled bu the panel, external terminals, or the RS485 TX/RX terminals (UART protocol). You will want to change that parameter so it uses the panel. If you are referring to the maximum panel dial frequency is only allowing 200-300 rpm, then look for the parameters to control the frequency. For 200 RPM: Hz = 200/60 = 3.33 Hz For 300 RPM: Hz = 300/60 = 5 Hz Conversion to RPM: If you ever find yourself yearning to reverse-engineer the process, the formula is as follows: RPM = Hz � 60 Look for values that match somewhere between 3 and 5 in your frequency parameters and replace them with 400 to give you 24,000 RPM max.

  • I have a 110 volt 2.2kw water cooled spindle. Can I run it with a 220 volt VFD?

    I have not tried connecting a 110V spindle to a 220V VFD; however, the parameters in a 220V VFD do allow changes to the values for the spindle motor. If you do plan on connecting the 110V spindle to a 220V VFD, damages can occur, so I would not recommend it. With that said, here is the output of an LLM: Using a 220-volt VFD (Variable Frequency Drive) to run a 110-volt spindle is technically possible, but it requires careful setup to avoid damaging the spindle. Here's what you need to consider: Check the VFD Specifications: Ensure that the VFD can be set up to output the correct voltage for your spindle. Many VFDs are capable of outputting variable voltages and can be configured via their programming settings to match the voltage requirements of the spindle. Adjust the Output Voltage: You'll need to configure the VFD to output 110 volts to match your spindle. This is crucial because supplying 220 volts to a 110-volt spindle would likely damage it permanently. Check the VFD's manual for instructions on how to adjust the output voltage settings. Set the Current Correctly: Besides voltage, make sure the output current does not exceed what your spindle can handle. The VFD should be configured to supply the current at the rating appropriate for the spindle�s power and voltage requirements. Consult the Manuals: Always refer to the manuals of both the spindle and the VFD. These documents can provide specific guidance on compatibility and settings. Consider Professional Installation: If you are not familiar with electrical systems or if the manuals do not provide clear guidance, it may be wise to hire a professional. This helps ensure that the setup is done safely and correctly. By taking these steps, you can safely use a 220-volt VFD with your 110-volt spindle, ensuring it operates efficiently without risk of damage. Just be meticulous with the settings and when in doubt, consult with or hire a professional.

  • What is the minimum RPM for the 2.2kW spindle?

    Spindles with 2 poles, which is typically for these types of spindles will have a minimum RPM of 6000 RPM or 100Hz; however, I would not run the spindle below 15000 RPM or 250Hz to give a safety factor and no damage will occur. If you have a 4 pole spindle, then much lower RPMs can be achieved, and with higher torque than a 2 pole spindle. The 4 pole spindle will require more power than 2 pole spindles and will not be able to achieve as high maximum RPMs.

  • i need wiring from vfd to spindle, prefer with vfd connector? about 15 feet. do you have or suggest where to get some.

    The wiring from the spindle to the VFD will depend on the power rating on the spindle. For a 1.5 or 2.2kw spindle, you can use 18/4 cable. Shielded: https://buildyourcnc.com/item/3d-printer-component-cnc-electronicsandmotors-shieldedcable-wire-4-conductor-18-awg-wrcon-cablewire4conductor18awg Unshielded: https://buildyourcnc.com/item/3d-printer-component-cnc-electronicsandmotors-cable-wire-2-conductor-18-awg-wrcon-cablewire3conductor22awg I recommend using a shielded cable as this cable may need to be routed through the machine along with delicate signal cables. The signal cables should also be shielded as well. The shield should be wired to protective earth.

  • i need wiring from vfd to spindle, prefer with vfd connector? about 15 feet. do you have or suggest where to get some.

    You can find wiring diagrams and illustrations for the spindle on this page: https://buildyourcnc.com/item/spindle-inverter-2!2kw-spindle-novfd This information pertains to the 2.2 kW spindle; however, the wiring is the same for the other spindles as well.

  • how to identify spindle? 1.5 or 2.2 my spindle has er20 collets,220 colt. black vfd

    A 1.5kW spindle will have ER11 (ER-11) collets. A 2.2kW spindle will use ER20 (ER-20) collets which can have bores for shanks up to 13mm or 1/2". Both spindles typically have an 80mm body diameter. 2.2kW can have a larger diameter from some manufacturers.

  • What is the spindle runout calculated at?

    The run out for the spindles that are sold here is less than 0.005mm or 0.0002 inches.

  • I am having troubles finding the PD program, I have the Pd but it doesn't show everything I need to program my VFD. Any help will be appreciated...

    When you power up your VFD, you can go into the programming mode by pressing the program button. You can press the up and down arrows to move through the parameters. Press the set button to go into the parameter to see the value of that parameter. If you want to make changes to that parameter, change the value with the up and down arrows until the desired value is shown, and press the set button to accept the changes.

  • What are the noise levels of the 1.5 Kw and 2.2Kw spindles?

    The noise level of the 1.5 kW and the 2.2 kW are very similar. The noise level is considerably quieter than typical routers. I am going to add sound db levels to this FAQ a bit later. Additional Information: The db (decibels) reading for the spindle is 70 and an 890 Porter Cable router (a lower powered tool than the spindle) measured 90 db. Both measurements were taken in the same environment and measured at the same distance from the tool. Additional Information: Practically silent. The inverter makes more noise! Additional Information: Practically silent. The inverter makes more noise!

  • DOES THE SPINDLE RUN ON A 50HZ POWER SOURCE?

    The spindle inverter (VFD) will run on a 220V (or between 170V-250V) power source with either 50Hz or 60Hz.

  • Does the 2.2kW 220V Spindle need Euro/AUS-style 240V power (1 hot, 1 neutral, 1 ground) or do North American 220V style welding plugs (2 hots, 1 ground) also work? Thx!

    Our 1.5/2.2kW spindle will work with both setups, in our wiring diagram it is more seen as the Euro/AUS-style, however you can do the same thing with the North American style as well. Also depending on if you have single or three phase 220V, you can use pins R, S, T. A manual will arrive in the VFD box, which will have further information and diagrams. Please seek a certified electrician if you are unsure of any aspect in wiring the spindle or VFD, since wiring to main lines will require wiring of the plug and main lines to the inverter and to avoid any damage or injury's while installing the 1.5/2.2kW spindle and VFD combo.

  • I�M LOOKING TO PURCHASE SPINDLE AND VFD WAS CURIOS IF THE SPINDLES COME WITH COLLETS SO WHICH ONES?

    Yes, all of the spindles come with collets. The collets have a 1/4" (6.35mm) bore for end mills that have a 1/4" shank. The ER specification is different for the 1.5kW (ER-11) and the 2.2kW (ER-20). Additional Information: Additional Information: Additional Information: