Zu Produktinformationen springen
1 von 9

BuildYourCNC

Vakuumpumpenregler

Vakuumpumpenregler

Normaler Preis $179.00 USD
Normaler Preis Verkaufspreis $179.00 USD
Sale Ausverkauft
Versand wird beim Checkout berechnet
Titel

Dieser Vakuumregler (Manostat) schaltet eine Vakuumpumpe automatisch ein, wenn der Vakuumpegel in einer Kammer oder einem Tank zu niedrig wird, und schaltet sie dann aus, wenn der gewünschte Pegel erreicht ist. Er hält einen bestimmten Vakuumbereich aufrecht, ohne dass eine manuelle Steuerung erforderlich ist – ideal für präzisen und wiederholbaren Betrieb in Vakuumformmaschinen, Pick-and-Place-Systemen, Thermoform- und Blisterverpackungsanlagen, CNC-Staubabsaugventilen, Vakuum-Arbeitstischen, Laborvakuumkammern und Vakuum-Lagertanks.

Ursprünglich für Pick-and-Place-Maschinen entwickelt, gewährleistet dieser Regler eine konstante Saugleistung für die Aufnahme und Platzierung von Komponenten. Er deckt nun eine Vielzahl von Anforderungen an die Vakuumsteuerung in der Industrie, in der Fertigung und im Labor ab, wo stabile Vakuumpegel unerlässlich sind.

Wenn Sie einen stabilen Vakuumdruckbereich aufrechterhalten müssen, ist dieser Vakuumregler – auch Manostat genannt – das richtige Gerät dafür. Stellen Sie einfach Ihre gewünschten unteren und oberen Vakuumschwellenwerte ein, und der Regler hält das Vakuum automatisch in diesem Bereich. Bevor ich dieses Gerät entwickelte, musste ich die Vakuumpumpe manuell ein- und ausschalten, um den Druck aufrechtzuerhalten; jetzt ist der Prozess vollständig automatisiert.

Der Vakuumdruckregler verfügt über zwei Trimmpotentiometer zur Einstellung der oberen und unteren Schwellenwerte, die eine Vakuumpumpe steuern, um den gewünschten Druckbereich aufrechtzuerhalten. Er verfügt über ein LCD-Display, das den aktuellen Vakuumpegel sowie die konfigurierten Schwellenwerte anzeigt.

Der Erfassungsbereich umfasst –115 bis 0 kPa (33,96 bis 0 inHg), wodurch die Kompatibilität mit den meisten Vakuumform-, Pick-and-Place- und Laborsystemen gewährleistet ist. Der Relaisausgang kann entweder als Normalerweise Offen (NO) oder Normalerweise Geschlossen (NC) konfiguriert werden und unterstützt Lasten bis zu 250 V / 12 A, geeignet zum direkten Schalten von Standardvakuumpumpen.

Funktionsweise:

  • Fällt der Druck unter den unteren Schwellenwert, zieht das Relais an und schaltet die angeschlossene Vakuumpumpe ein.
  • Steigt der Druck über den oberen Schwellenwert, fällt das Relais ab und schaltet die Pumpe aus.

Betrachten Sie diesen Vakuumregler als Schutz vor niedrigem Vakuum – zuverlässig, präzise und vielseitig in Automatisierung, Fertigung und Forschungsumgebungen.

Vollständige Details anzeigen

Instructions

1
Step 1
This video demonstrates an improvement made to the vacuum pump controller. The values for the thresholds and the actual sensor inches of Hg is now in decimal form with a precision of 2 decimal places.
2
Step 2
This video describes the features of the vacuum pressure controller. All of the features are explained and demonstrated.
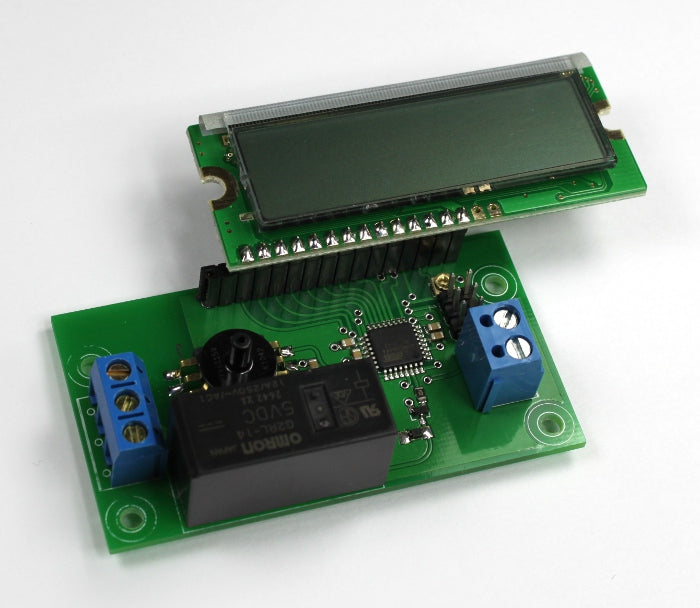
3
Step 3
The vacuum pressure controller requires 5 volts of power. This power can come from the computer via a USB cable, or a 5 volt power adapter. The controller requires very little current to drive the relay on this board (Relay coil: 80 mA with a coil resistance of 62.5 ohms). If a computer USB cable is used, cut the cable and expose the red and black wires from the cable. The other wires and shielding can be removed, or cut short as they are not used. For both a USB cable, or adapter, the +5V wire (red wire in the USB cable) is fastened inside of the terminal closest to the LCD. The GND (black wire in the USB cable) is fasten to the terminal farthest from the LCD.
4
Step 4
Adjust the low end threshold using a small screw driver at the left potentiometer trimmer. This will adjust the number labeled L: and is shown in inches of mercury (Hg). When the actual pressure is less than or equal to the low end threshold the relay will engage (send current to the coil of the relay and close the two terminals for NO-normally open operation.
5
Step 5
Adjust the high end threshold using a small screwdriver at the left potentiometer trimmer. The high end threshold is labeled as H: and is shown as inches of mercury (Hg). When the actual pressure in the pressure sensor is greater than or equal to the high end threshold, the relay will disengage, or opening the terminals for NO (normally open) operation).
6
Step 6
Use a tube that will fit over the pressure nozzle that has a diameter of 0.1165 inches (2.95mm). A silicone tube with a 1/16 inch inside diameter works well which stretches around the nozzle of the pressure sensor.
7
Step 7
Insert the tube over the vacuum pressure sensor nozzle. This tube will connect to the device that holds the vacuum or the line that is connected between the vacuum pump and the tank. Make sure to use a check valve between the vacuum pump and the tank (or container/device that will hold the vacuum). A check valve is a device that only allows air to travel one way. This will prevent the vacuum from escaping the tank back into the vacuum pump. The pressure sensor hole should be fitted onto the tube after this check valve, or fitted directly onto the tank.
8
Step 8
Use either an extension cord, or the power cable from the vacuum pump and remove the outside insulation. It is best to use an extension cord so that the main power cable for the vacuum pump is not damaged.
9
Step 9
Cut the black (live) wire in the AC cable and expose the strands. The live/black wire is used as this is the safest wire to pass through the relay.
10
Step 10
Insert one side of the black wire into the lower terminal. This terminal is the main terminal of the relay that will provide one side of the relay switch. Insert the other side of the black wire into the top position of the terminal. This position is the NO (normally open) position of the relay and will be open when the relay is disengaged (i.e. the two black wires will not be connected - open). When the relay is engaged, these positions will close (be connected). The middle terminal is a NC (normally closed) position with respect to the bottom terminal. Use this terminal if you want to reverse the on/off function of your vacuum pump.

Questions & Answers

Have a Question?

Ask a Question
  • What is the min. / max. vacuum that the sensor can detect / display? What is the min. / max. adjustment of the replay trigger using the two potentiometers? Thanks in advance for the cool design work you did. Very well done.

    The maximum that the onboard vacuum pressure sensor can detect is -115 kPa which is roughly 33.9 inches of mercury. The two potentiometers (trimmers) can be adjusted up to the maximum range of the onboard sensor. Thank you for the kind words.

  • HI After purchasing one for a test that worked really well, Im interested in purchasing a batch of 10 of these units but wonder if the display being attached to the control board through a ribbon cable or even a header so that it can be mounted at 90 degrees from the main board? Please can you let me know? Could i get a discount on 10 boards?

    Yes, these boards can be assembled with ribbon cables connecting the LCD to the main PCB. Please contact me via the contact page, or using the chat on this website to contact me for this change to the order. The website chat goes directly to my phone.

  • What are the overall dimensions of the USB interface board? Is there a CAD model available?

    The dimensions for our USB breakout board are: L: 2.745"/ 69.723mm W: 2.244"/ 56.9976mm H: .501"/ 12.7254mm Currently we do not have a CAD model on hand.

  • Can I get the circuit diagram of the pressure controller?

    Here is a list of videos on my designing the vacuum controller/sensor circuit: https://www.youtube.com/watch?v=bm888ntJiVs https://www.youtube.com/watch?v=hYZ2Sw4SeTA https://www.youtube.com/watch?v=8wCrMzrPoeo https://www.youtube.com/watch?v=-M7tiNmgTrM https://www.youtube.com/watch?v=o3eo23OmjtQ https://www.youtube.com/watch?v=PJO_XoLL6lQ

  • I accidentally put 12vdc to the controller and now the display does not work. Can this be repaired?

    The 12VDC applied to the input voltage terminals most likely damaged the microcontroller, the LCD, and the vacuum sensor. It can be repaired, but the repair will cost more than a new vacuum pressure controller.

  • I need a similar device with slightly different operating parameters/features: push button to activate pump initially, high set point turns off pump and starts a 30 sec timer, if low set point triggers during window activate Red LED else activate Green LED. Can you assist with this?

    I would not have a problem with modifying the design; however, the change you are requesting would require a large batch purchase since the PCB design would require modifications and a new batch of PCBs would need to be purchased.

  • What sensor is used and what is the resolution of the sensor?

    The pressure sensor used in this controller does not have a specific resolution since it is analog; however, the microcontroller used in this controller receives the information from the sensor using an ADC (Analog to Digital) converter. The resolution through this process is 10-bits. A 10-bit number is from 0-1023 (1024 possible values). The accuracy of the sensor is 1.5%.