Zu Produktinformationen springen
1 von 3

BuildYourCNC

redFrog Bestückungsautomat – Für Bastler erschwinglich und vollständig hackbar

redFrog Bestückungsautomat – Für Bastler erschwinglich und vollständig hackbar

Normaler Preis $1,000.00 USD
Normaler Preis Verkaufspreis $1,000.00 USD
Sale Ausverkauft
Versand wird beim Checkout berechnet
Titel
BuildYourCNCs eigene Bestückungsmaschine für die Öffentlichkeit. Dies ist die Bestückungsmaschine, die wir intern zur Montage unserer elektronischen Produkte verwenden. Der redFrog (unser Name für die Bestückungsmaschine) ist eine Maschine, die sehr kleine Bauteile (SMD - Surface Mount Devices) aufnimmt und auf die Leiterplatte (Printed Circuit Board) platziert. Falls Sie sich immer noch fragen, was diese Maschinen tun, sehen Sie sich bitte das Video unten an, das den gesamten Montageprozess zeigt, beginnend mit dem Auftragen der Lötpaste, dem Bestücken und schließlich dem Sintern (Reflow) der Platine, um die Teile mit der Platine zu verbinden. Diese Maschine wird ständig weiterentwickelt und die Funktionen werden mit weiteren Entwicklungen und Überarbeitungen aktualisiert. Zu den Merkmalen der redFrog Bestückungsmaschine gehören der Saugnapf für die Bestückungsfunktion, die 3-Achsen-Bewegung und -Steuerung, der Rollen- und Bandhalter, die durch die Schwerkraft gezogene Bandabdeckung und der interne Computer. Die Saugleistung für die Aufnahme der Komponenten wird durch eine Vakuumpumpe (3 CFM) und eine Tankkombination erzeugt (das gezeigte Vakuum ist möglicherweise nicht das im System enthaltene). Der intern untergebrachte Computer ermöglicht es dem Benutzer, die Maschine bequemer zu platzieren (nur Tastatur, Maus und Monitor, nicht im Lieferumfang enthalten, werden an die Maschine angeschlossen). Die Bewegungssteuerung erfolgt durch Schrittmotoren für alle Achsen und die Teilrotation und wird von Treibern mit einer Leistung von 3,0 Ampere angetrieben. Ein guter Sockel ist noch in der Entwicklung, daher benötigen die aktuellen Maschinen einen Sockel/Tisch von 21-1/2" x 20-1/2" (546,1 mm x 520,7 mm). Das im Video gezeigte Gehäuse ist nicht enthalten, da es wirklich nicht die eleganteste Lösung für dieses System ist. Spezifische Details bezüglich der Schritte pro Zoll und Abmessungen: Die Schritte pro Zoll sind relativ zur Mikroschritt-Einstellung, die Sie an den Treibern vornehmen. Die für die X- und Y-Achsen verwendeten Antriebsriemenräder haben eine Steigung von 0,2 Zoll und 14 Zähnen. Die nativen Motorschritte pro Umdrehung betragen 200 Schritte. Mikroschritte pro Einzelschritt: 16 (1/16 Mikroschritt an den Treibern eingestellt). Die Schritte pro Zoll sind also wie folgt: = (200 * 16) / (0,2 Zoll * 14) = 3200 / 2,8 = 1142,86 Schritte / Zoll. Erwarten Sie 900 - 1000 effektive Schritte pro Zoll, da die minimale Belastung am Endeffektor die Abweichung nicht wesentlich beeinflusst. Sie können die Mikroschritt-Einstellung auf 1/32 oder 1/64 erhöhen, und Ihre effektiven Schritte pro Zoll werden zunehmen. Der Bereich, der für das PCB-Layout reserviert ist, misst 5-3/4 x 15-1/4 Zoll (146,05 x 387,35 mm). Die PCBs können in Gitterform angeordnet werden, und der G-Code ist so konzipiert, dass er jede der PCBs durch Schleifen und Verschieben platzieren kann (automatisch vom G-Code behandelt). Sie stellen nur die Parameter für die angeordneten PCBs und die Abmessungen der eigentlichen Platine ein. Sie können eine panelisierte PCB in diesem Bereich anordnen oder die PCBs einfach in einem engen Zeilen- und Spaltenraster platzieren. Die Vakuumpumpe wird von einer Schaltung mit einem Drucksensor gesteuert, nicht im Lieferumfang enthalten (ähnliche Schaltungen, die in industriellen Anwendungen verwendet werden, haben aufgrund ihrer Spezialisierung einen sehr hohen Preis). Diese Schaltung hält jederzeit einen Saugdruckbereich im Tank aufrecht, sodass die Bestückung ihre beste Leistung erbringen kann. Der Saugdruckbereich wird durch zwei Potentiometer (Komponenten, die wie ein Drehregler an einer Stereoanlage eingestellt werden können) gesteuert, um ein hohes und niedriges Vakuum aufrechtzuerhalten und das Vakuum nur dann zu betreiben, wenn der Tank dies erfordert. Dieses Vakuum wird in Zoll Quecksilbersäule angezeigt. Je höher die Zoll Quecksilbersäule (Hg), desto höher das Vakuum.
Vollständige Details anzeigen

Instructions

1
Step 1
This pick and place project is recommended for advanced users. The assembly requires understanding mechanical principles, connecting computer components and installing the operating system, solding connections, connecting pneumatic equipment and working with mains voltage (120/240v). If you have any reservations on your abilities to complete this project, take a look at the assembly videos, which will give you a good idea on the difficulty level of this project. Full redFrog Playlist on Youtube (For assembling the redFrog Pick and Place Machine)
2
Step 2
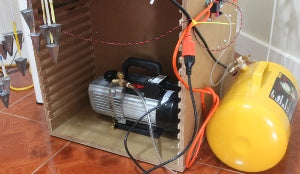
Correct pneumatic configuration for the redFrog (or other) pick and place system. Tube Fittings are shown in a heavy line weight. Thin lines between the fitting are 1/8" ID silicone tube All straight fittings have 1/8" barbed connection and a 1/4" Male NPT (Nation Pipe Thread) with the exception of the fittings for the solenoid valve. The solenoid valve ports have 1/8" female NPT thread, so 1/8" male NPT fittings are used. The solenoid valve in engaged when the suction is needed, which is received from the tank's reservoir of pressure below the current atmospheric pressure. It is intended that the solenoid activate using the computer control. The check valve is needed so that the pump can be off for the time that the tank is adequately pressurized. If a check valve is not used, there would be leakage from the vacuum pump when not in use. It is highly recommended that a vacuum pressure sensor be used in conjunction with this system to provide automatic tank pressure regulation using a pressure sensor and relay to control the vacuum pump when the tank falls below a specific level of inches of Hg (Mercury). A vacuum pressure sensor switch can be found at http://www.buildyourcnc.com/item/ electronicsAndMotors-vacuum-pump- controller-sensor This schematic can also be used to setup a manual pick and place system using a foot pedal, or other type of controlling mechanism connected to the solenoid valve for suction control.

Questions & Answers

Have a Question?

Ask a Question
  • What's the cost of a Bluechick 4.2 with computer ready to go shipped to Reno NV. porter 892 set up.

    The price for the blueChick is here: https://www.buildyourcnc.com/blueChickVersion42CNCMachineKit.aspx You will want the kit without electronics that will cost $1360.00. Then you will need either the redSprout, or redLeaf CNC computer systems and the prices can be found here: https://www.buildyourcnc.com/AssembledElectronics.aspx The redLeaf has a bit more power and speed than the redSprout. You will need to purchase windows, found on that page, if you desire that OS to be installed. Otherwise, we will install Linux and linuxcnc. You will also need to purchase the length of motor wire that you need from the motors to the computer. This is variable and is determined by the position you wish locate the computer system with respect to the CNC machine. The shipping is determined at checkout. When you have the items in your cart, enter your shipping information and click on "calculate shipping". You will need to select your shipping preference, service and carrier.

  • I was wondering what was the difference between the two pair of goggles you are selling for the blacktooth. The tinted laser goggles and the Honeywell laser CO2 goggles

    The Honeywell brand goggles meet ANSI certification Z136.1, relating to the safe use of lasers, and are calibrated to optimally block the specific wavelengths of light produced by CO2 lasers (the details are available in the website description here: https://buildyourcnc.com/item/laser-components-goggles-safety-honeywell.) The generic tinted goggles also block the specific CO2 laser wavelengths, but a good deal of other wavelengths as well. That and frame style variation is the basic difference.

  • hello, my question is, I recieved two breakoutboards exactly the same, do I need them both for my greenbull 4x8 also, I cant find any tutorial showing the installatio and placement of the limit switches, can I have some assistance please? sorry fot he bad english and thanks.

    No, you should not have received two parallel breakout boards in your CNC kit. You can return the extra item using standard shipping with COD. Our apologies for the confusion and the inconvenience. I will answer the other question as another FAQ. Please check the Customer Service page to see the answer to that question. If you have difficulty finding the answer, here is a link: https://www.buildyourcnc.com/FAQ/13636